Raw materials are the lifeline of a business. You always carry raw material inventory for meeting demand, price increase, cover lead time and get quantity discounts benefits. However, it proves to be among the expensive assets of the business with poor management. While you carry the raw materials inventory for a longer time period, time eats the business profits. It is as the carrying costs such as storage, damage, obsolescence, etc. range between 15% to 40% of the inventory cost.
Therefore, manufacturers practice inventory of lean raw materials. It is done for lessening their wait time and it results from production bottlenecks and transporting such inventory items. The primary lean manufacturing purpose is eliminating waste. Further, there are seven waste types that companies must get rid of and the Raw Materials Inventory is among them. It is as such inventory can sit like a waste when it doesn’t move through the process of production. Therefore, you would have to manage the raw material inventory by adding Inventory item types in QuickBooks. And it must be done in a way to increase production efficiency and also deliver quality goods at low costs. Further in the article, we discuss raw materials, raw material types, and all the right ways for calculating the inventory item types in QuickBooks accounts software.
About Raw Materials
In business transaction recording raw materials are among the input items used for manufacturing finished goods. These are unprocessed materials used for manufacturing finished goods to be sold to the final consumers. Thus, raw materials account for inventory assets.
Further raw materials can also be known as commodities. It is as if they are bought and sold on the Commodities Exchange globally.
Now, as a business, it is either possible to purchase raw material inventory or extract raw materials by yourself. Further two types of raw materials are there. These materials include indirect or direct materials. Thus, examples of raw materials are rubber, grain, natural gas, forest resources, oil, etc.
Explaining Raw Materials
As it is stated earlier, you can record the raw materials like an inventory asset on the balance sheet of your business. Further, you would need various raw materials for producing finished varied products.
Thus, the raw material type for the business must be based on the manufacturing activity you undertake.
For example, when you’re a company that manufactures toys, you can need plastic like a raw material. Thus, raw material inventory gets recorded in a systematic format on the company’s balance sheet and income statement. It is because the raw material is among the vital inventory item types in quickbooks.
Raw Material Inventory Accounting
The manufacturing companies can classify inventory into three categories on a balance sheet. The inventory includes work-in-progress, finished goods and raw materials. You must note to record the inventory in an all-inclusive value. In such value you get costs ranging from the preparation, storage, to finished goods shipping.
Further, it is also possible to buy the credit or cash basis and inventory. As per the accrual accounting system, you would have to record Inventory item types in QuickBooks with the following journal entries.
In Case Raw Material Inventory Purchase Is On Cash
The raw material account gets debited and thus, you increase the business current assets. Whereas, with a credit Cash Account you signify the cash outflow. It lessens cash balance through the bought inventory amount.
When You Buy Raw Material Inventory On Credit
In such a case debiting raw material accounts can signify increase in the business current assets. Whereas, crediting accounts payable can imply a higher amount of company creditors. It is as if you’ve bought the raw materials on credit.
Now, the labor takes raw materials from your warehouse to the production place in case you’re running a manufacturing unit. This would require you to record another journal entry while depicting the goods shifting from raw materials to work-in-progress. The journal entries are as follows:
Likewise, work-in-progress inventory shifts to the finished goods inventory after you convert the work-in-progress inventory into finished goods. The journal entry is the following:
Indirect and direct raw Raw Material
The accounting treatment for raw materials is based on whether they’re indirect or direct raw materials. That is, how much materials are recorded in the income statement and the company balance sheet.
Direct Raw Materials
Direct raw materials are the primary items from which you produce the finished goods. They are items that are identified directly with the final product and also physically form part of the same. For example, fabric, wood, etc. are used for making furniture items such as chairs, tables, etc. Likewise, eggs, and wheat flour, eggs, etc. usable in making bakery items such as toasties, cookies, etc.
Accordingly, direct raw materials can form part of the current assets of the company. It is recorded as expenses as a portion of the total cost of production.
The total produced cost of goods is further divided into parts. The first is the cost of goods sold (COGS) that appears on your income statement. The second part is closing inventory that appears on the company balance sheet.
Additionally, the direct raw materials are considered as variable costs. It is as the total amount of needed raw materials can vary according to the output change.
Indirect Raw Materials
On the other hand, indirect raw materials are the raw materials that you cannot trace directly to the final product. These are used simply in the production process for supporting finished goods production right from the raw materials. Some examples are nails, polish, etc and these are used for making furniture. Likewise, gloves, molds, butter paper, etc. are usable in the manufacture of bakery products.
Now, the indirect raw material inventory is generally accounted for in the following ways. In either form, some part of manufacturing overheads is allocated to COGS. For this purpose, an appropriate method of allocation is also usable. For this method, you would have to debit overhead costs and credit raw material inventory for recording indirect raw material. Then, the total overhead costs are also allocated to the COGS with the ending inventory by the time the accounting period ends.
Use of Raw Materials for Goods Manufacture
All production units can undertake the process of turning raw material into the finished product. That is, it is for using raw materials for manufacturing goods. Thus, the raw materials are primary inputs that the business also makes use of for manufacturing finished products. You can either extract the materials from minerals, manufacture them on-site, or buy the same from the suppliers.
Further, you can decide on the method used to process the raw materials after choosing them.
Thus, you would have to finalize the manufacturing process for turning the raw materials into finished goods. Simply stated, it is raw material changing into a few significant products through many tools, machinery labor, etc.
Thus, businesses worldwide also add some value after refining and processing raw materials into something useful. Such value increase also enhances finished goods prices and also turns manufacturing activities more profitable.
However, with more time, the process to use raw materials for manufacturing goods is changed. On one hand are conventional processes where you produce finished goods by hand.
Such goods generally include items such as decorative pieces, textiles, furniture, etc. On other hand, there are finished goods that are made through sophisticated technology. Some examples are computer hardware, mobile devices, etc.
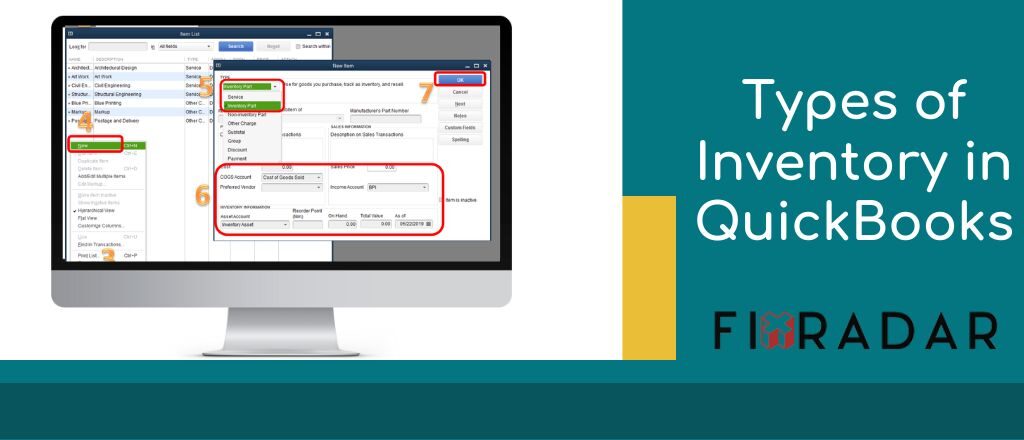
Make And Add Inventory Items Or Services in QB Pro
The process to make and add inventory item types in QuickBooks Pro version is described in a step-by-step approach below:
- Tap on the “List” on the Menu bar.
- After that you need to tap on the item list, followed by opening the option Item List Window.
- Now click on the Item tab located at the lower left-hand corner of the list window for making services in QuickBooks pro.
- After you see a drop-down menu, choose the option “New” for opening the item window.
- In the option next, the user must try the Service from the drop-down Type.
- Now, the user must manually put in an item name in “Item Name/Number”.
- When you want to make the service like another service sub-item, choose the Checkbox right in front of the Sub-item.
- Choose the option “Main service item” within a category where the user wants to add up a current item in the drop-down located in adjacent.
- Now write about all the provided services in the description box so you can see the same in “Invoices” and “Sales receipts”.
- Enter the rate at which you provide the services and select the right “Tax code” for that service.
- Select an “Income account” for the service sales from the drop-down Account.
- Now select the following checkbox for changing the appropriate fields. It is for mentioning the services bought by the customers in the ‘Invoices”.
- Now in the option “Purchase Information Box” enter your “Purchase details”.
- Furnish the sales descriptions for the Sales Information service and it would make a Service item.
- The final step would be hitting the “OK” button to save the same item into the item list.
Various Product and Service Types and How To Change Them
From an exception for the inventory and bundle items, it must be noted that the services and products can be changed easily for one item type to another. The mentioned items generally have another tracking method. An important point to note is that 4 types of items are there in the list of Products and Services on the QuickBooks accounts application.
Various Service/Products Types
There are four service/product types for options available to add inventory item types in QuickBooks.These are as follows:
Inventory items: You can buy the inventory items and sell them and users can also track their quantities. You would need to select the required tracking Quantity on Hand option for the type of item.
Non-inventory items: For defining Non-inventory items, it is said that they are the ones that you can buy and sell but it won’t be possible to track the quantities, like bolts and nuts usable in installation.
Services: You can get services like landscaping, training, and support for the customers.
Bundle: These are similar to a product/service collection and it is possible to jointly sell, for example, a beach kit including the towel, flip flops, sunscreen, and various other items. The user solely decides whether they want to display or hide the bundle components, while printing/sending transactions.
For adding or editing the bundle items. Users have visited the services/products option through the bundle section and it is set like he/she wants to show these bundle items.
Note: The tracking inventory feature is available only in the Online Plus version of QuickBooks. Also, you can only use the bundle items or create the same in the QuickBooks Online browser version. The iOS or Android mobile applications are yet to support them.
Some Ways For Changing The Service/Product Types
‘Changing Service Items To Non-Inventory Items
- For this process you must click on the “Gear icon” on top and choose the option “Products and Services”.
- Click on the option checkbox in the service items front that you must change.
- And the user must click on the option “Batch actions” drop-down box, followed after they choose the option “Make non-inventory”.
Changing Non-inventory Item(s) to The Service Items
- Firstly, tap on the “Gear icon” on top, and choose the option “Products and Services”.
- Click on the “Checkbox” on the non-inventory item(s) front that you must change.
- Single-click the drop-down “Batch actions” and select the option “Make service”.
Changing Non-inventory or Service Items To the option Inventory Items
The process to change non-inventory or service items to Inventory item types in QuickBooks is as follows:
- Firstly, the user must tap “Gear Icon” on top, and with that choose the option “Products and Services”.
- The user must Search the option “Item you want to update” and visit the “Action column”. Click on the button “Edit”.
- After you’re done with that, the user must choose “Change type link” and choose the button “Inventory”.
Here are some important details that you must enter:
- Initial in-hand quantity.
- As of an effective date (It has to be noted that the mentioned must be prior data to any transactions where the item was used).
- Inventory Asset, Expense, and Income accounts.
- Cost, Sales Price, and Sales/Purchase information.
- The final and last step is choosing the option “Save and Close”.
Note: That it is not possible to convert all inventory items to other types. When you wish to change the inventory item types in QuickBooks, you would need to make new items.
Item Types Supported By QuickBooks
Items are maintained on Lists>Item List Menu selection, but the Item Types are pre-configured in QuickBooks and it is not possible to maintain the same user.
11 Item Types are:
- Inventory Part
- Service
- Inventory Assembly
- Other Charge
- Non-inventory Part
- Group
- Subtotal
- Payment
- Discount
- Sales Tax Group
- Sales Tax Item
Tips: Another 12th type of item is the Fixed Asset. It is found under Lists>Fixed Asset Item List menu selection.
Change Item Types Products and Service in Online QuickBooks Version
Further in the guide, we will learn about changing item types for a service or a product. On adding the services and products as QuickBooks items, you should provide them a type. Four item types are there: non-inventory, inventory, bundles, and services. Such inventory helps in product categorization and the services are better to track. On picking the wrong type, it is possible to change the same later on. There are many things that you must keep in mind, and we also help in making the best possible choice.
Changing Item Types
When you’re changing the non-inventory and service items to other types. It means that you’ve changed the non-inventory items to an inventory or service items. Or else it is possible to change a service item to a non-inventory or service item.
Note: It is not possible to change the bundle items. With QuickBooks, they automatically get a category.
Learning About The Service And Product Types
- Visit Settings and choose the option “Products and Services”.
- Find a non-inventory or service item that you wish to change.
- Choose the option Edit in Action column.
- Choose the option Change Type.
- Choose the Non-inventory, Inventory or Service.
- Follow the below mentioned steps for setting up items like the service item or non-inventory, or inventory item.
- After doing it choose the option Save and Close.
- On changing various items to non-inventory or service items, using the Batch actions on services and product list.
Adjusting Inventory Items
The inventory value depends on the quantity you’ve got in stock. QuickBooks can track the value in the Inventory Asset account, which is a Balance Sheet part. You can also change inventory item types in the same way as it deletes the assets that are a business overall value part. When you want to change the inventory item to another type, you’ll get some options. It is a simple sale you need in stock. Make inventory items inactive, with zero quantity. Then it is possible to make a new service item or a non-inventory item for replacing it.
Or while making a mistake and removing the inventory item, users can make inventory adjustments. It is essential for recording all the changed things and everything is perfectly balanced. You must adjust the inventory for any other reason without any help from the accountant. When you’re not sure, reach out to the accountant. It gets tricky and they also know about handling further steps.
When you want to take out an inventory item, there are various steps for the same. The very first move would be properly adjusting inventory item’s quantity:
- Choose the option settings and then click on Products and Services.
- Find inventory items. Then choose the option Edit from the column Action.
- In the Quantity on hand section next to the Adjust option, choose Quantity.
- In the inventory Quantity Adjustment Window, enter the word 0 in the column New Qty.
- Choose the option Save and close.
Now you don’t have inventory for that QuickBooks item. Next, you would need to get total adjusted value:
- Choose the option Settings and select Chart of Accounts.
- Find the Inventory Shrinkage account and choose the option Run report.
- Search for the adjusted inventory item. Now note down the adjustment amount.
Finally, you must make a journal entry for accounting adjusted inventory:
- Choose the option +New.
- Choose the option Journal Entry.
- On the first line, choose the Opening Balance Equity from the dropdown account.
- In the column debit, enter the adjustment amount.
- On the second line, from the account dropdown, Choose Inventory Shrinkage.
- For the Credits column, enter the same adjustment amount.
- Choose the option Save.
Using Item Categories In QuickBooks Desktop Enterprise
Further, we will learn about categorizing the Inventory item types in QuickBooks Desktop Enterprise.
It is possible to use the item categories for keeping all your items organized. While running reports it is possible to get all helpful insights.
Note: When you’re using categories in the QuickBooks Enterprise version, you can upgrade the company file(s) to the current release. We improve the featured categories and it is turned off in Release 1 (R1).
Editing an Item For Adding Category
You can choose the category while editing an item through:
- Visit the lists, and choose the option Item List.
- Choose the appropriate item for adding a category and select the option Item. Then you need to choose the option Edit Item.
- Choose the Category.
- Choose the current category or Add New to create a new category. When you’ve got a parent category, you can choose Is a subcategory for making a new sub-category.
- Now enter the optional description. When you’re finished, select the option Save, and click on OK.
Tips: Repeat as per your requirements for various items and even makeup to 4 item categorization levels.
Category Management
In the list of new items, users can perform various category operations when they are adding different Inventory item types in QuickBooks.
- Visit the Lists and choose the option Manage Category.
- Choose the option Manage Categories and select the option Add New Category.
- Enter the name of the category. If you’ve got a parent category, users can choose Is a subcategory for creating a new subcategory.
- Now enter the optional description. After doing it, choose the option save, and click on the Ok button.
Editing Categories:
- Visit the option Lists and choose the option Manage Category.
- Right-click on the category you want to edit.
- Choose Edit Category.
- You can choose the name of the category. It also shows whether the category is a subcategory of any parent category.
- Then, users can edit the category, after altering the path, name or description.
- After finishing the process, choose the option Save and click on OK.
Deleting The Categories:
- Visit the Lists and choose the option Manage Category.
- Right-click on the category you wish to delete.
- Choose the option Delete category
- Now you need to move items in that particular category or in the sub-categories before deleting that category.
- For confirming, choose the option Yes, delete.
Moving Multiple Items To Category:
It is possible to move one or various items from one category to another. The following steps explain the princess to move many items to category.
- Choose the category you want to move.
- Checkmark all items you want from the category you wish to move.
- Choose the Batch Actions below your list and select the option Move to different categories.
- Select the new category/sub-category where you wish the items to move.
- While you’re done, choose the option Save.
- You’ll be asked to confirm the items to move. Choose the option OK.
Users can find and filter and choose items to quickly enter the transactions.
- After you’re in the transactions window, it is possible to choose the item.
- Choose the option Find and Select items.
- Choose the category/sub-category
- Choose the item of choice from the trimmed list.
Reports With The Categories:
It is possible to see items and their categories in the listed reports below.
Inventory – Note: For viewing the inventory reports, turn on the option Inventory and Purchase orders are active in the Items and Inventory Company Preferences.
Choose one of the below-mentioned reports:
- Hierarchical view: Inventory Valuation Summary
- Flat view: Inventory Valuation Summary (after you enable the category column from the customized report)
- Inventory Valuation Summary by Site
- Inventory Stock Status by Item.
- Worksheet of Physical Inventory.
Items
Select any of the below-mentioned reports:
- List of the item price
- Listing of item
Tips: With the report, it is possible to see the item list with the subcategories and categories when you want to add various inventory item types in QuickBooks.
It is possible to filter a report after a category.
- Choose the option Customize Report and visit the Filters tab.
- From the Filter list, choose the option Category.
- Choose the category of choice from the list and click on the option OK.
Final Verdict
With the help of the aforementioned flight, it is possible to add any items or services that you want for running the business with ease. Most apps must make and get information about the service and product items so the users can add them to their transactions and invoices. While developing an application, you must consider the things required by the application and what is already available in an end-user QuickBooks Online company.
Additionally, items are connected to various accounts. With this businesses can track the item value, the cost of buying and producing them, and the money made from sales. For any query and assistance, it is possible to contact expert technicians as they can guide you step by step through the process and ensure query resolution at the earliest.