
Intuit’s accounting software QuickBooks offers a feature to connect your bank or credit card to the online version of the software. This helps you track all the transactions to manage your finances better. Sometimes, you might face problems getting the bank feed or checking the transactions due to QuickBooks Error 350.
The error usually appears on the screen when the connection to the bank or credit card account added to QuickBooks expires or is updated by the bank. After getting the error, reconnect the bank with the QuickBooks desktop application.
Some Lesser Known Facts About QuickBooks Error 350
When you first connect the QuickBooks desktop application with your bank or credit card, some banks allow it to stay connected for 18 months. However, other banks need to reconnect after 90 days. The error starts displaying on the system when the connection between the bank or bank’s credit card and the QuickBooks expires.
The system also triggers the error when the account is updated with the bank itself. You can easily fix the error 350 in QuickBooks desktop by applying a few troubleshooting steps without any hassle, and it doesn’t require any prior technical knowledge. When the error usually hinders your tasks and workflow, you’ll be able to see the error message stating:
- can’t connect bank error 350.
- Wells Fargo Bank connection is not working; the security question doesn’t match.
- The old connection doesn’t work.
Uncommon Reasons That Cause QuickBooks Error 350
QuickBooks is one of the finest software, especially built to manage the finances of a business. However, while working on it, you may face various issues, such as QuickBooks error code 9000 and 350. The users need to know the root cause of the QuickBooks error 350 verify ToC to fix the issue without hassle.
This also helps them apply only effective troubleshooting methods and steps. Otherwise, the error will take too much time to get resolved. Here are some of the possible reasons for having a QuickBooks error 350:
- Server-related issues.
- No or unstable internet connection.
- Corrupt or damaged company files are in the system.
- Expired connection between QB and bank or credit card.
- Old connection of QuickBooks with a bank.
- Company file size exceeded.
- Unusual shutdown.
Brilliant Ways to Corner the Error 350 in QuickBooks Desktop
If you still face issues connecting the QuickBooks desktop to your bank server during your workflow, QuickBooks error 350 Transfer of Credit is possible. Some methods and processes are completely effective and working to fix this problem. Here is a list of all the solutions. Please note that there are different ways of resolving the QuickBooks error, including the online method and the QuickBooks Desktop Application.
Rectifying the QuickBooks Error 350 in the Desktop Application
There are various methods available to eliminate the issue from your system. To rectify the error 350 in QuickBooks Desktop, follow the below methods properly:
Method 1: Using the Rebuild Data and Verify

To use the Rebuild Data and Verify tool option in the application, follow the mentioned steps to fix QuickBooks Error 350 Transfer of Credits:
- Go to the File menu.
- Select the Utility option.
- Click on the Rebuild Data.
- Select the OK button when the pop windows prompt is displayed on the screen.
- Select an easy-to-find location to Save and Create a Backup of Company Files.
- You will receive a notification when the Rebuild Data process is finished.
Follow the steps to verify the data once the rebuilding is finished:
- Click on the File Menu.
- Go to the Utilities option.
- Select the Verify Data option.
- Now, Run the tool.
- The tool will start checking the file for data issues.
- If there is any issue in the Company file, click the Rebuild Now option.
- Once finished, open and check if the issue remains or not.
Method 2: Manually look for the Issue in the QuickBooks Log File
If the issue persists, you must manually find and fix the error 350 in QuickBooks desktop in the QB Log File. You can make this happen by:
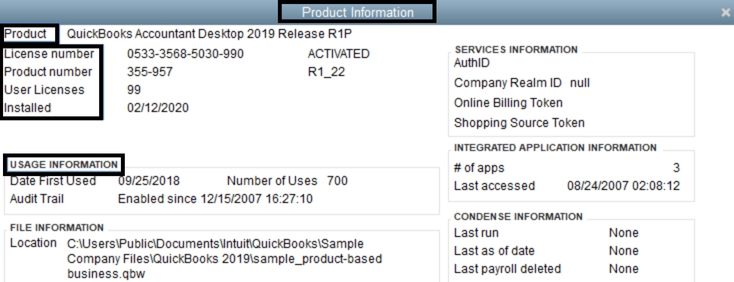
- Visiting the QuickBooks homepage.
- Press F2 to run the product information.
- Click on the F3 button to open the Tech Help option.
- Now, click on the Open File button.
- Locate the Log File.
- Open the File when found.
- Now, search for the error message and the error transactions.
Method 3: Re-Establishing the Connection Between QuickBooks and Bank
Re-establishing the QuickBooks and bank or credit card connection can quickly fix the issue. To resolve the QuickBooks error 350, take a look at the below-mentioned steps:
- Go to the Banking option.
- Click on the account showing an error.
- Follow the link next to the message “Sign in to your (Bank’s Name).“
- Then, enter all the Banking Information.
- Select the account that you want to link to the QuickBooks desktop application.
- Then, click on the Continue button.
- Now, select the Update button to update the latest updates to show the correct information and transactions.
Method 4: Manually Updating the Account Details
The QuickBooks error 350 can be fixed or resolved by manually updating the bank account details. Here are the possible steps of the process:
- Open the QuickBooks desktop application.
- Go to the Banking section.
- Click on the Update button on the Banking Page.
- It may ask to complete the Multi-Factor Authentication (MFA).
- Once completed, click on the Continue Update option.
- Now, check if the issue is resolved or not.
Fixing the QuickBooks Error 350 in QuickBooks Online
After completing or applying all the methods in the QuickBooks desktop application, if you are still facing the issue, you can directly opt for the alternative methods available to apply in QuickBooks online. Alternatively, you can opt for these online methods directly before implementing the desktop methods.
Method 1: Updating and Reconnecting the QuickBooks with Bank Account
Reconnecting the QuickBooks with already updated bank details may eradicate the issue quickly. Check whether the issue is fixed or not after applying the below steps:
- Firstly, open the QuickBooks desktop application.
- Click on the Book keeping option.
- Then, go to the Transactions option.
- Now, click on the Banking tab.
- Select the Bank Accounts button.
- Look for the blue square bank icon to connect your preferred account.
- Then, click on the “Sign in Link.“
- Now, enter the User ID and Password of your bank’s website.
- Choose the accounts for which you want the transactions to appear on the QuickBooks application.
- Then, click on the Continue option.
- Once done, click the Update option to get all your bank’s recent transactions.
Method 2: Clear the Browser Cache
In most cases, users reported facing the issue due to the browser cache. When they cleared the cache of their default browser, the error was quickly fixed. You can try to do the same to rectify it with the help of the below-mentioned steps to your browser:
Firefox Browser
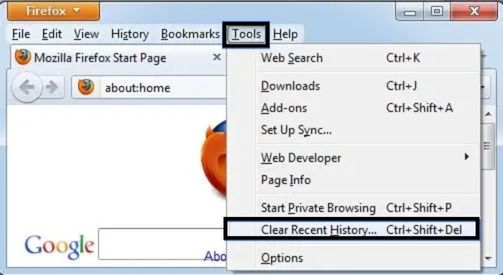
- Open the Firefox Browser.
- Go to the History tab.
- Click on the Clear Recent History.
- Then, select the “Clear All Cache and Junk Files” option.
- Mark the checkbox of “Cache” in the drop-down.
- Now, close the Firefox.
- Restart the browser to check whether “We Weren’t Able to Show Your Payroll Information” still appears.
Internet Explorer
- Open the Internet Explorer.
- Click on the Gear Icon.
- Select the Safety option.
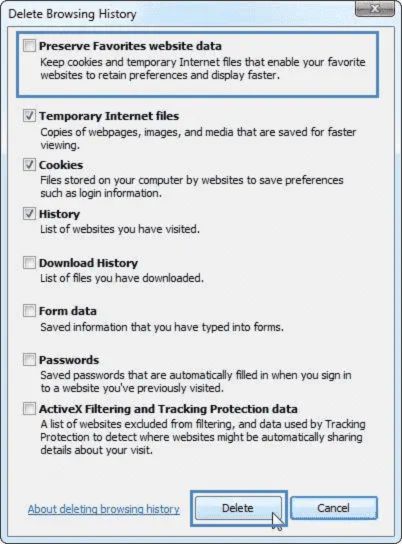
- Click on the Delete Browsing History.
- Unmark the “Preserve Favorites Websites Data.“
- Mark the “Temporary Internet Files” checkbox.
- Then, click on the Delete button to proceed.
- Lastly, click on the OK button to finish the process.
Google Chrome

- Open the Google Chrome browser.
- Now, click on the three dots in the top right corner of the browser.
- Select the History option from the menu.
- Click on the Clear Browsing Data option.
- You’ll see an option of “Obliterate the following items from:“
- Select “the beginning of time” from the drop-down.
- Lastly, click on the Clear Browsing Data option to finish.
Safari

- Firstly, open the Safari browser.
- Click on the Preferences in Safari option.
- Select the Advanced option at the top of the Window.
- Now, click on the “Show Develop Menu in the Menu Bar.“
- Then, click on the Develop option.
- Lastly, select the Empty Caches option.
- Close all the opened windows in Safari.
- Restart the browser.
- Now, sign in to QuickBooks Online to see if the issue persists.
In The End!
QuickBooks Error 350 usually displays on the screen when QuickBooks cannot connect with the bank account or credit card due to expiry or update by the bank. The issue is not permanent and can be fixed quickly by following a few easy troubleshooting steps. After implementing the methods, if the issue remains, you can connect with a QuickBooks technical expert!
Frequently Asked Questions About QuickBooks Error 350!
QuickBooks Error 350 is a commonly occurring banking error in the QuickBooks desktop application. The error starts displaying on the screen when an issue connects the bank server to QuickBooks. This usually indicates that the bank account has expired or has an updated connection with the bank.
Server downtime, no or unstable internet connection, damaged or corrupt company files, etc., are some possible reasons for getting a QuickBooks error 350 in the system.
You can follow some effective troubleshooting methods to fix your system’s QuickBooks error 350 ToC. These methods include reconnecting the QuickBooks with the Bank Account, clearing the browser cache, manually updating the bank account details, etc.