Business owners can reconcile the accounts so they match the credit card and bank statements. Like balancing the checkbook, you must review QuickBooks for ensuring they match the credit card and bank statements. This reviewing process is known as reconciling.
When you have bank statements, you can compare all the transactions with the ones in QuickBooks. When things match, you can know the accounts are accurate and well-balanced. It is suggested to check, credit card, and savings account each month. Here is how to enter bank statement in Quickbooks desktop as you can go through the detailed reconciliation guide stated below. The step-by-step guide explains what to do before entering a bank statement in QuickBooks, how to enter and edit bank statements.
Essential Things To Note While Reconciling Bank Statements
The below-mentioned step-by-step approach discusses the basics of reconciling bank statements on QuickBooks software from the very beginning till the end. With precise and balanced accounts you’ll have everything matched in perfect manner. Here is how you can begin with reconciling different accounts per month.
Step 1: Review Opening Balance
When you reconcile an account for the very first time, review its opening balance. It must match the balance of the real-life bank account for the decision day for tracking QuickBooks transactions.
Tips: You can also save steps after linking credit cards and banks to online banking, which can automatically download the transactions and enter the opening balance.
When you forgot to enter an opening balance in QuickBooks in the past, do not worry. Here is how to, later on, have opening balance.
Note: Enter service change and interest-earned options are only available when the bank account is not linked to online banking.
Step 2: Start Reconciliation
After the monthly credit card statement, it is possible to reconcile. When you have reconciled various months, do them one statement at a time starting with the oldest statement:
- If accounts are linked to online banking, ensure you are matching and categorizing all downloaded transactions.
- For QuickBooks Online, select Settings and then Reconcile. When you are reconciling for the first time, choose the option Get Started for continuing.
- From the dropdown Account, choose the account to reconcile. You must fix it before beginning.
- Enter the Ending date and Ending balance on the statement. According to some banks, the ending balance is also known as the “closing balance” or “new balance”.
- When you’re noticing it, you can review the Last statement’s ending date. This is the end date of the last reconciliation. The current bank statement should begin the day after.
Tips: When you are ready to begin, start reconciling.
Step 3: Compare The Statement With QuickBooks
Now, compare the transactions on the statements with what is there in QuickBooks. Go over them one by one. The tricky part is ensuring that you have the right transactions and dates in QuickBooks so you would know that things match.
- Follow section for the account types you are reconciling:
- Reconcile the linked accounts to online banking
- Reconcile accounts that are not linked to online banking.
- Next Steps: Review the past reconciliations
- Now you must run reconciliation reports for reviewing the work:
- Select Accounting or Bookkeeping, then you must choose Reconcile (Take me there).
- Choose the option History by account.
Tips: You can use dropdown menus for choosing the date range and account. Or else export or print the reconciliation report when you must share them.
Edit The Finished Reconciliations
Users can have changes in past reconciliations, but they should be careful. Changes unbalance the other reconciliations and accounts. It can also impact the next reconciliation beginning balance.
You can begin after you review a previous reconciliation report. When you have mistakenly reconciled a transaction, here is how you would be able to unreconcile the same. When you have adjusted reconciliation through mistakes or must begin over, you can contact your accountant. Such changes can be complicated.
Some Easy Steps For Fixing QuickBooks Bank Reconciliation
You can know how to enter bank statement in quickbooks desktop when the entered transactions in QuickBooks don’t have the transactions on the bank statement. You need to follow the step-by-step instructions stated below to fix the QB Bank reconciliation problems.
Step 1: Review Opening Balances
Many QuickBooks reports tell you if anything is added. Hence for checking reports for following the provided steps.
Firstly, Run Reconciliation Discrepancy Report
This report is for confirming the latest changes that have been there since the previous reconciliation. The same has been arranged by date of statement. You can follow the instructions provided below:
- From the drop-down menu choose the option “Reports”. From the menu banking, choose the option “Reconciliation Discrepancy.”
- Select the reconciling account now, and press the option OK.
- Analyze individually made adjustments. After getting the reason, make transaction changes.
Step 2: Run Reports of Missing Check
Here you will see whether all checks are missed, after running the missing check report. With a report for a missing check, you can get information about closing reconciliation balance. These are the steps:
- Visit the “Reports” menu. Choose “Banking” option from the menu drop-down, then “Missing Checks”.
- Choose the account that you wish to reconcile and click on OK.
- Examine the report. Search any transactions that are included in your report but don’t exist on the statement. Make sure that they must be on the reconciliation when they are not on the bank statement.
Now, Run the Report for Transaction Detail. In addition, use following statements for determining whether the transactions have changed:
- It has been suggested for you to begin with Reports section. Choose “Transaction Detail” from the menu “Custom Reports”.
- Select “Display” tab.
- Choose the account date of recent reconciliation found on the section Date to field.
- Now select the “Filters” on drop-down.
- On Account field, choose the account that you’re reconciling.
- Choose the Date in the Last Modified/Entered box to date of recent reconciliation. Later it is possible to change the date to the current date in the field.
- For running the report, click on the OK button.
- Check the credit card or bank statement for any unmatching transactions.
Contact individuals who made changes. There can be reasons for change. After you figured out how to enter bank statement in Quickbooks Desktop, leave your transaction.
Step 3: Look For Adjustments in Reconciliation
Sometimes the users must make reconciliation adjustments for forcing bank records for matching QuickBooks. You must not make reconciliation adjustments without accountant guidance. In addition, with adjustments, you don’t resolve any errors, and when you’re resolving errors, a subsequent QuickBooks adjustment causes processing issues. So, make sure no incorrect adjustments are there in the account.
- Choose “Chart of Accounts”.
- Open account meant for the reconciliation discrepancies.
- Choose recent reconciliations dates in the column “Dates”.
- When you are noticing inaccurate adjustments affecting your balance, you must inform the one who made changes. Remember that changes are not conflicting with your adjustments.
Note: Make sure to follow all instructions to know how to reconcile a bank statement in Quickbooks desktop and resolve the QB Bank Reconciliations issue.
Process To Manually Enter Bank Statements In QuickBooks Desktop
In the current process, you’ll learn how to reconcile bank statement in QuickBooks desktop. You will learn about directly entering bank transactions in your check register and modifying the entered information. It is also good to discuss why it won’t typically be a good idea to directly enter bank transactions into a check register unless you have a quick data entry requirement.
With the guide stated below you would be able to effectively use the QuickBooks Desktop and reconcile bank statement in Quickbooks Desktop manually. It is possible to add these to purchase orders, invoices and other such transactions.
Note: Avoid uploading any sensitive information such as Social Security numbers, credit card numbers and health info.
The general methods to import the bank transactions into QuickBooks are as follows:
- Through using automatic sync between the QuickBooks and Bank account.
- After you use CDV Excel files for importing Quickbooks bank transactions.
Note: When the aforementioned methods don’t process that, then you would need to manually enter Bank transactions in QuickBooks.
Before You Manually Enter Bank Transactions in QuickBooks
You would have to set a bank account before you know how to enter bank statements manually in Quickbooks Intuit Desktop. These are the ways to enter bank transactions in QB Desktop manually:
First Step:
- Users must open the software QuickBooks.
- Now they must click the option ‘Settings’. The option is marked with the ‘gear icon‘ which can be seen beside the left of your Company name.
- Now you need to click the ‘Chart of Accounts.’
Second Step:
Now click on the option ‘New’ and you will see an application form online. You will have to fill the details for:
- Category Type
- Detail Type
- Name
- Balance
- Description
- As of
Later after careful verification of the aforementioned information on how to reconcile bank statement in Quickbooks Desktop, you would need to fill all of the aforementioned fields.
- Now click on the option “Save.’
- Click on the button ‘Close’ after you have saved the fields.
Third Step:
- The created account appears on the account list chart.
- Now carefully review the same to get any errors.
Fourth Step:
To know how to manually enter bank statements in quickbooks desktop, check that the register option opens up into the below sections list where you can make changes as per your liking:
- Ending balance
- Bank Register
- Reconcile
- Memo
- Payee Account
- No./Type
- Date
- Payment
- Balance
- Deposit
Fifth Step:
- Now in the register you will see a drop arrow. Click on it.
- There it would be possible to select the transaction that you would need to make.
- Keep up with the upcoming section to know about all the steps in entering a transaction.
Manually Enter Bank Transactions In QuickBooks
You must follow the steps to know how to enter bank statement in Quickbooks Desktop 2018:
- Click on the ‘+’ icon.
- Select the transaction that you want to make.
- Click on the ‘Statement’
- Select the statements that you must create.
- Click on the options ‘Close’ and ‘Save’.
When You Want To Make A Transaction For Vendors and Customers:
You must follow the steps provided below for making transactions of Vendors and customers:
- For this process click the icon ‘+’.
- To make a customer transaction, click on type under the ‘Customers’.
- To make a vendor transaction – under the ‘Vendor’ click on transaction type.
- Put the transaction details and click on the option ‘Save’.
- Click on the option ‘Close.’
Service Scope
Let’s hope that after thoroughly going through the article you were able to ‘Manually enter QB Bank transactions successfully. After you manually enter the QuickBooks bank transactions when you’re facing a certain problem, they’re always present for assistance.
Tips: You can get 24×7 assistance. Also you can chat with live experts.
Download Bank Feed Transactions in QuickBooks Desktop
Step 1: Set Bank Feed Mode in QuickBooks
Prior to proceeding, you must ensure that the bank feed mode has been either set to express or advanced mode. Express or advanced are similar, except with the advanced mode users get availability of options for categorizing their transactions. They can see whether they don’t accidently choose to let you import the QuickBooks.
For setting the preferences for the bank, click on the Banking menu, choose Bank Feeds, and then click on Change Bank Feeds Mode as shown.
You would now notice a new pop-up screen. Here you can choose bank preferences. Under the menu checking, ensure that it is either in Express or Advanced mode. After default, QuickBooks Desktop is set to Advanced mode. Continue after clicking the blue OK button.
Step 2: In QuickBooks Desktop Log in to your Bank Account
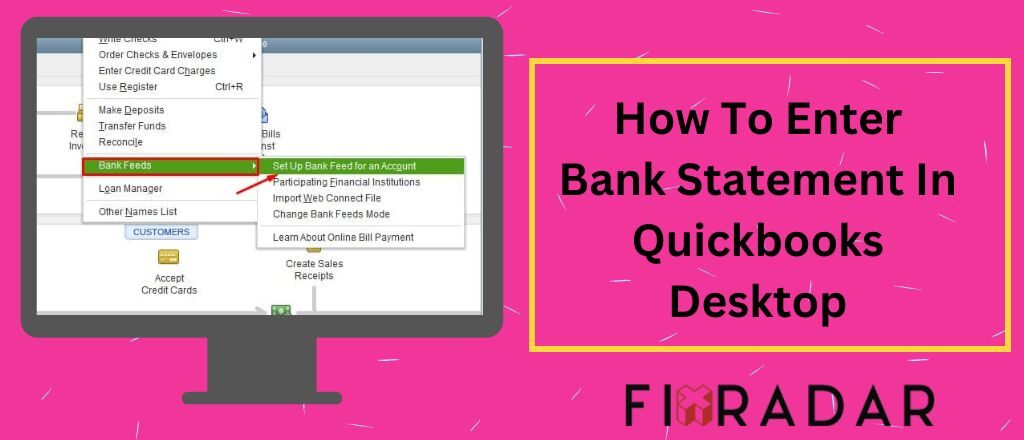
In the homepage of QuickBooks Desktop, click on the Banking menu on the screen top. Choose the option Bank Feeds. Now click on the option Set Up Bank Feed For An Account.
You’ll see a pop-up asking you to shut all the opened QuickBooks Windows temporarily. Click on the option Yes for continuing.
Step 3: Establish A Connection Between QuickBooks And Bank Account
Later after clicking on the option Yes, you’ll see a bank feed setup screen. Now, from here on, you’ll have to enter the bank’s name. Whether you’ll connect QuickBooks with a bank account would depend on the bank you’ve got an account with, so the instructions would differ from bank to bank. Now follow the prompts you see on-screen.
Next, you’ll notice a log-in screen, with the request for entering the log-in credentials and bank account used for accessing bank account information of the bank’s website.When you didn’t already sign up for online bank access, it would be essential to do it before continuing. From there on, follow prompts on linking with the bank.
Step 4: Review Checking Account Register
Before you import the transactions, review everything you see in the account register. It makes it easy to check whether you’ve recorded new transactions in the register. For this purpose, click on the option Use Register, present in the menu Banking.
Step 5: Importing the Bank Transactions To QuickBooks
With established bank feeds, the bank transactions are automatically imported daily into QuickBooks. A benefit of importing the transactions from bank feeds is you won’t need to import the bank transaction manually into QuickBooks, lessening the efficiency and accuracy.
Step 6: Reviewing And Managing Transactions In Banking Center
After importing the transactions, you’re straight away taken to the Bank Feeds Center, where the new transactions are shown in the tab Transactions pending for review. Here you see categories namely Partially recognized, Unrecognized, Added to Register and Recognized.
How To Manage Recognized Transactions
While QuickBooks matches a bank transaction to the one already recorded in the books, it goes straight to the Recognized tab. We recommend that you review details before you click on the button Confirm. Under the Recognized tab, on the left side of screen, you see the confirm button (that doesn’t show) with three dropdowns: Not a Match, Ignore and View details.
Not a Match: Choose it when the bank transaction isn’t the same one that is matched in QuickBooks. The transaction goes into the tab Unrecognized.
Ignore: Users can click on the option when they don’t want to do anything about that specific transaction.
After confirming a recognized transaction, it is entered into the account register, like reflected in the tab Added Register. The objective is entering three transactions in the register.
Download Bank Transactions in QB Desktop With Direct and Web Connect
Banks can offer any of the two methods for downloading transactions. Choose a download method to learn how to reconcile bank statements in Quickbooks Desktop and the ways to use them.
- Web Connect
- Direct Connect
Direct Connect For Download
The first time while you’re connecting, QuickBooks automatically downloads maximum transactions available from the bank.Based on the bank, this offers you up to a year of historical transactions. With most banks it is only possible to download till 90 days historical transactions.
- Visit the Banking
- Choose the bank feeds and also choose Bank Feeds Center
- From the list of Bank Accounts, select the account to link.
Tips: (Optional) In the section Send items to your bank, choose online link Online Checks for editing or canceling payments.
- After getting ready to get the transactions, choose the option Download Transactions.
Note: When you’ve already downloaded transactions but didn’t review them, choose the Transaction List. Here are the ways to review the same.
- Choose Synchronize.
- When you wish to download transactions for a certain amount, choose the option Sync this account.
- For downloading transactions of all the accounts at the same bank, choose the option Sync all for this Bank.
- Now in the window Access, enter the password or the PIN for connecting to the bank.
- Choose the option OK.
After downloading transactions, you can match or add new ones.
Note: It is possible to delete (previous added/matched) transactions. After deleting the downloaded transactions, it is possible to again download these. It avoids any duplicate entries.
Downloading With Web Connect
Some banks allow setting download date ranges. When the bank doesn’t allow the option, you would get the maximum transaction amount available for the first download time. It can be around 30, 60 or 90 days or even more based on the transaction bank.
You can know how to upload bank statements in Quickbooks Desktop through Web Connect via two ways:
While you use QuickBooks Desktop
- Visit the Banking.
- Choose Bank Feeds and choose Banking Center.
- Find a bank and choose the option Download Transactions. It opens a browser window redirecting to the official bank website.
- Sign in to the website to download the Web Connect file.
Tips: When you’re singing in the bank website to download the Web Connect file.
When you’re out of QB Desktop
- You can open a web browser and visit the bank’s official website.
- Now sign into the bank account through the normal process.
- Download transactions as a QB Web Connect (.qbo) file.
Note: All banks have many methods to download QB Web Connect files. When you’re unsure about doing it, you can visit the website of your bank and check their steps. In case it’s difficult to find, contact the bank for assistance.
4. After having a Web Connect file, you must follow all the steps for importing the same into QB Desktop.
How Can You Undo or Delete Reconciliation For An Account?
- Choose a banking option.
- Above the column action, choose “Go to Account History/Registry.”
- The next step would be determining the transactions that must be reconciled.
- While at it, click option R on the top line, located between the deposit options and the amount.
- This alters the slot status from BLANK to C, which indicates it is also cleared.
- You can now simply click the option Save as the final step; you will then get a pop-up, click the option YES, and now you are all set to go.
Manually Undoing Reconciling in QuickBooks
For the mentioned above steps failing to solve the problem, it is also possible to opt for manual options like the follows:
- Click the icon settings on the accounts software and choose an accounts chart.
- After the account list is present, as it is in the below step, you can click the row you want to view and you can click “Account history”.
- After you identify the account you want to change, you can alter the reconciliation status after you click the checkbox beside it.
- As you make the QuickBooks file disaster recovery, you should start familiarizing yourself with abbreviations. Here by C, we mean Cleared, by R we mean Reconciled, and by BLANK space we mean that no options are selected yet.
Undoing QuickBooks Online Bank Reconciliation
Here are the steps to import receipts from bank statement in Quickbooks desktop:
- Click the icon Settings and after that click the option Reconcile appearing on the Tools below.
- Choose bank account you would need reconciliation for.
- Now select the cursor over to the reconciliation month, and you’ll see an Undo Option emerging, that you should choose. Later, you’ll get a message popping up. Choose it.
Tips: After successfully finishing the above steps, you’ll also notice a success screen displaying on the monitor, and you would again need to click the option OK.
Reconciling QuickBooks Desktop Bank Statement
With a decade worth of QuickBooks cloud hosting experience, it would be fine to say that fixing problems in bank reconciliation is quite simpler on QuickBooks desktop version, than online version.
You can do it with these steps:
- For reconciling the account, visit the Banking Tab or the Screen and also Click the option “Reconcile”.
- You’ll see a screen start reconciling. “Choose account” on which you wish to fill details, reconcile and select “Continue”.
- Finally for finishing the process you must Click the option “Reconcile Now”.
Dealing With Statements Reconciled One-After-The-Other
After reconciling all transactions, you’ll have to follow the provided steps:
- Click the option ‘Registers’ from the menu Banking.
- Now, choose the account that you have to deal with, from drop-down Register.
- Click a certain transaction that you must un-reconcile, and also erase the alphabet “R” that you’ll get right above your transaction. It can be changed according to your request.
What Do You Mean by QuickBooks Bank Reconciliation Issues?
Businesses must reconcile the monthly bank accounts to avoid inaccuracies. Regular QuickBooks bank account reconciliation ensures the users about following points:
- You rectify the problem with this process. Additionally, the users also analyze any discrepancies in banks and records.
- It is also great to have time to time notification of fraudulent transactions that occur.
- Users must reconcile the credit card/bank accounts within the QuickBooks for regularly ensuring accurate outcomes.
- Some Reconciliation Problems Seen in QuickBooks
Here there are a few common reasons resulting in QuickBooks reconciliation issues:
- Whether missing checks are there in QuickBooks or not.
- Wrong QuickBooks adjustments.
- Mistakes are there in making QuickBooks entries.
- There is a missed transaction entry in the transactions database of QuickBooks.
Why Does Bank Reconciliation Don’t Match in QuickBooks?
When the bank reconciliation starts in QuickBooks, it might be that sometimes a mismatching closing balance. Sometimes missing or duplicate entries can happen in QuickBooks. Someone enters QuickBooks software with money in the account and has not yet cleared the bank.
Is it possible to reconcile accounts with QuickBooks?
QuickBooks can automatically organize the data, making reconciliation a simple process. Simply choose the account that you wish to reconcile with QuickBooks. With the in hand statement, you can check off some transactions matching one after one after checking boxes besides them. Moreover, you can reconcile the bank, savings accounts and account with credit card each month.
What are the reasons to Undo Reconciliation Statements?
There are a few reasons due to which one would have to undo bank reconciliation statements:-
- Inaccurate payment date entry.
- There can be an un-reconciled transaction. All transactions can be accurately verified, and you must ensure that no checks are there with due payments.
Tips: There can be a case of wrong bank reconciliation. For ensuring that no surprise reconciliation statements are there, you must have a thorough review.
Conclusion
QuickBooks is a comprehensive solution that provides multiple powerful functions, and glitches or problems that can show up. QuickBooks reconciliation statements have a pivotal role and they should show correctness attributes. Thus, all discrepancies can affect all financial records. Due to this make sure to follow the aforementioned steps and you will get precise and accurate statements. If the above steps don’t help you in entering a bank statement you can chat with QuickBooks experts and avail easy and quick resolution for the same.