
The most renowned accounts software QuickBooks is most widely preferred by medium and small sized businesses and freelance accounts professionals. In the QuickBooks software, working on Multi user mode lets multiple users work on the same company files at once. QuickBooks error H202 is inevitable and caused by external and internal technical glitches.
The error H202 happens when you want to use the multi-user mode on QuickBooks or when QuickBooks also fails to open company files stored on another system.
The article intended to assist in determining H202 error QuickBooks. The methods of resolution are simplified further with simple steps for fixing the H202 error on QuickBooks while opening company files from the workstation.
Common Causes of Error Code H202 on QuickBooks?
On opening the company file, QuickBooks also attempts linking to the QuickBooks server. The QuickBooks error code H202 starts when QuickBooks isn’t able to link the remote server because of hosting configuration settings and isn’t able to open company files. Following are all the possible causes for it.
- The Desktop version on QuickBooks doesn’t have access to the IP address of the server or the host.
- .Nd th file is damaged or corrupted.
- DNS settings aren’t incorrectly configured.
- System firewall also prevents company exchange data between the server and the QuickBooks.
- The host settings are configured incorrectly.
- Some services such as QuickBooksDBXX and QBFCMonitor aren’t operational.
- Some problems are there on the Database Server Manager of QuickBooks.
What is QuickBooks H202 Error: Multi-user Mode
Further we know the H202 error QuickBooks symptoms (Multi-user Mode):
QuickBooks is slow and occasional stops and freezes work for a few seconds when it is being used. When you can’t enter multiple user mode the QuickBooks error code H202 message appears on the system screen and puts a stop to your workflow on the software. Therefore, you must know all the error signs and ways to repair the software in the least possible time.
General signs of H202 QuickBooks Error Message
When it becomes difficult for users to differentiate between the error code H202 QuickBooks server 2016 and other problems that show up in the program, you can look at general error symptoms for confirmation –
- You wouldn’t be able to work in single-user and multi-user mode.
- The QuickBooks screen might not respond or not show anything.
- Windows can suddenly shut down or prevent computer device damage.
- The screen can turn blurred.
- Certain QB window tabs might stop working.
Thus, you’re most probably facing the QuickBooks error H202 when you see any of the symptoms we just stated.
Ways Of Resolving QuickBooks Error Code H202
Professional methods are always recommended to resolve QuickBooks errors thus any of the below mentioned methods would work and the outcome would depend on the root cause of the issue. Thus, any of the following ways are useful to eradicate the H202 QuickBooks Error and ensure smooth workflow on the software.
Solution 1: Checking Connectivity on Network
- In the system where you get the error, the H202 opens the Run window after pressing (R+Windows keys).
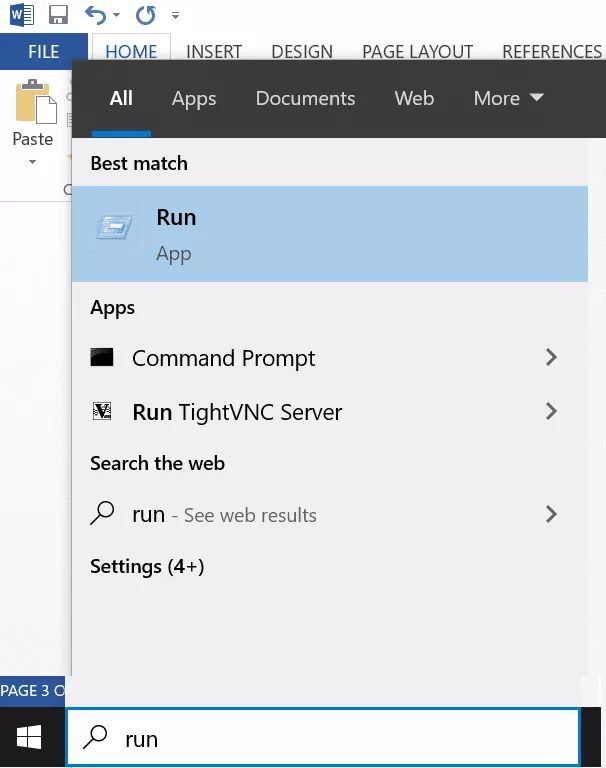
- Enter the cmd into the box and later press the button OK.

- Then ping the server from the system.
- Later type the ping server name and press the key enter.
- It is possible to carry out such outlined steps on all systems that are going through the same error.
- With slow response or when you’re losing a packet, there can be an issue after the network that needs repair.
Solution 2: Using File Doctor Tool on QuickBooks
The file doctor on QuickBooks software is a dependable tool for troubleshooting by Intuit for diagnosing and resolving many error types like the QuickBooks error H202, H101, H505 and H303. For using the tool you would need to firstly download the same from the official website of Intuit and run the same. You can follow the steps provided:
- Firstly, download and then install the file doctor tool on QuickBooks by launching QuickBooks tool hub.
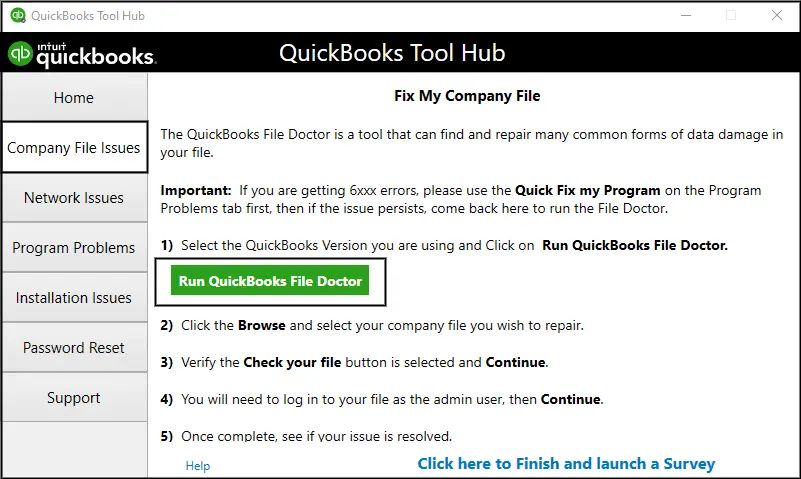
- Then from the tool hub in QuickBooks, choose issues in company files and also launch tools.
- From the drop down menu, you must choose the company file. When you can’t find the file, click on the button search and browse.
- After being finished, check on the box next to the file and press the button continue.
- Then the final step would be entering the admin password on QuickBooks and clicking on the button Next.
Important Note: The scanning time is determined from the file size and the same can take around 5 minutes for most cases. You must open QuickBooks software after finishing the scan.
Solution 3: Run Database Server Manager on server From QuickBooks Tool Hub.
- Then you must scan the folder storing QuickBooks company files.
- The next step would be configuring firewall ports as it has been instructed from diagnostic.
- Also, follow further instructions on diagnostic tool connection.
- Finally, try opening QB company files on a system which QuickBooks error H202 shows up.
Solution 4 – Ensure That QuickBooks Services Run Appropriately
QuickBooks services must run on the server computer. Follow the steps mentioned below for checking whether QuickBooksDBXX work or not, and also repeat the same for QBCFMonitorService.
- Also type Run into the search bar in Windows.
- In the window Run, type the words services.msc and then also click on Enter.
- In the services window, double click and browse QuickBooksDBXX on the list.
NOTE: XX notes is the QuickBooks version.
- The QuickBooksDBXX Properties Windows gets displayed: Choose Automatic as the Startup type.
- The Service status should be set to either get Started or Running. Or else, you can click on Start,
- Then click on the Recovery tab.
- Select Restarting the Services from all drop-down menus: Second failure, Subsequent failures and First failure.
- Click the button Apply and click the OK button for saving changes.
Repeating steps for the QBCFMonitorService. After completing steps, open QuickBooks on all workstations. Click File menu and select Switch to Multi-user mode options. After everything opens up correctly you’ve fixed the issue.
Solution 5: Adding Server To Windows Hosts File

For adding a computer server to Windows hosts file, you’ll have to edit the file. For this purpose, you must follow the steps below: Browse the following paths for opening Windows hosts file (on system getting error):
- C:\Windows\Syswow64\Drivers\Etc.
- Double-click hosts file.
- On getting prompted with the message ‘How do you want to open this file’ select the Notepad.
- After the last IP address, in the hosts file, enter Server’s IP address followed by the server name.
NOTE: You can use TAB key rather than using space bar to separate server name and IP address.
- Choose the option Save from File menu.
- Click the button Exit.
After you execute the steps mentioned above, you must open the company file in the multi-user mode. Proceed to the next solution to solve QuickBooks error H202 when it does not work.
Solution 6: Set the Hosting To Local Files
After you follow these steps, you’ll ensure that client system isn’t trying to host same company file:
- Launch the QuickBooks and also press the F2 button for opening the screen Product Information.
- In the lower left corner, choose the Hosting for reflecting ‘local files only’ under the option Local Server Information.
- On your system visit the start menu on Windows.
- Type “database” word in the space to search.
- From the list, select Database Server Manager in QuickBooks.
- Look at the folder that contains company files. It is also possible to use the feature browser for locating such a folder.
- Later click on the button Start Scan for starting the scan process.
- Users can use QBDBSM for modifying system firewal settings.
- After finishing the scan, click on the button Close.
- Users must launch QuickBooks on workstations where they see the error.
- Then visit the File menu and then select the same.
- After you click the button, switch to multi-user mode.
Solution 7: Verifying Services on QuickBooks
- When the server runs the full QuickBooks version, you can start the mode multi-user hosting after you follow the steps mentioned below.
- On the server, open QuickBooks
- Choose the option file, followed by the option Utilities.
- Choose a multi-user access host.
Later you must follow the below mentioned steps for checking QBCFMonitorService ndQuickBooksBDXX on your server:
- Firstly launch the dialogue box Run.
- Type the word services.msc in text space, then press the button OK.
- Select the option QuickBooksDBXX.
- Check Startup types to know whether it is Automatic.
- You can do it when the Startup type isn’t set as Automatic.
- Check service status and ensure it is running.
- Choose it from the tab recovery.
- Then also restart service of all drop-down menu features for the first second, and then for subsequent failures.
- Later, click on the option apply and also on OK buttons.
- Finish all QBCFMonitorService preceding steps.
Solution 8: Adding Services and QuickBooksDBXX on Admin Group
You can allow the QuickBooksDBXX and QBCFMonitorService for accessing servers like Windows administrators. When such services don’t already have admin permission, grant the same to them as it also resolves Error Code H202 QuickBooks. Check for noting whether the accounts solution is usable for multi-user mode. Otherwise, you can proceed to another step.
Solution 9: Customizing System Firewall Settings
Through the system firewall you can occasionally prevent any data transfer among QuickBooks and servers. For that case, you can follow the steps provided below for configuring the firewall settings to get uninterrupted communication among the server and QuickBooks.
- Adding exceptions to system firewall settings.
- Changing system firewall permissions and launching the QuickBooks software on all the systems.
- Under the file menu, you can select the option Switch to multi-user mode.
Solution 10: Adding Server to Windows Host File
- As an initial measure, you must close all the windows with QuickBooks software.
- Then navigate to the directory C:\Windows\System32\Drivers\Etc or C:\Windows\Syswow64\Drivers\Etc on server.
- After prompting for programme, you should double-click on host file and then choose Notepad.
- Manually enter IP addresses and the name of the system.
- Enter the system server name and the IP address. In the system case, enter server IP address with the system name. For separate the IP address and the system name, use on Tab key on the keyboard rather than the Space bar.
Attempting to open QuickBooks in the multi-user mode to see whether the error code H202 in QuickBooks is resolved or not.
Solution 11 – Having QuickBooks ports in Firewall
For ensuring that the Firewall isn’t obstructing QuickBooks multi-user ports, it is suggested to include ports corresponding to the QuickBooks in Firewall version. Let’s look at the diverse port lists for various versions of QuickBooks.
- Firewall Ports for QuickBooks 2016: 8019, 56726, 55368 – 55372
- Firewall Ports for QuickBooks 2017: 56727, 8019, 55373 – 55377
- Firewall Ports for QuickBooks 2018: 55378 – 55382, 56728, 8019
- No static ports are there In 2019 QuickBooks version: The ports automatically get renewed after running company files in Database server managers.
Solution 12 – Using Control Panel For Repairing QuickBooks
- You won’t have to close QuickBooks on different systems. The repair file for QuickBooks is done on different systems at same time.
- Furthermore, you won’t have to open control panel in Windows and select Features and programs.
- After these steps, users must select QuickBooks and then subsequently click on repair and change from vast list of the programs installed.
- Later, you can proceed with provided onscreen instructions for beginning repair process.
- After finishing repair, you must update the QuickBooks version to current release.
Finally open company files to check whether the repair steps for QuickBooks 2022 error H202 were useful or not.
Solution 13 – Renaming .TLG an .ND files for fixing error H202 on QuickBooks
- At the start of the method, it is best to close QuickBooks.
- Thereafter, you should open the company file folder on the server system.
- Look and opt for the .tlg files related to QuickBooks file showing error.
- Now you would need to right click on Tlg files and select the option Rename.
- For name change, have Prefix” .old” prior to file name and click on the Enter key.
- You must try similar steps for Network (.Nd) file and close folder.
- After performing all the above steps, you’ll create .nd and .tlg files automatically while again opening the company file through QuickBooks (the new files are free of suspected problems).
- Then you must open company files after you hit Alt key till you open files.
The method would also troubleshoot the problem of error H202 QuickBooks.
Solution 14 – Changing The Company File Location
Changing the original company file location helps in resolving error H202 in QuickBooks Desktop. Users must perform simple steps provided below to ensure the problem is fixed:
- Make a new folder, preferably in C: Drive on your system for storing company files.
- Afterwards select Company file and .TLG file from the current folder of company file and hit Ctrl + C keys for copying.
- Then you must proceed to the New company file folder and also top on Ctrl + V keys for pasting system files.
- Check whether it is possible to open files in Multi-user mode.
After you change the company file path you can resolve the error H202 QuickBooks without taking too much time.
Solution 15 – Windows Host Files And Adding Server
- For starting process, close all Windows on the system.
- Post that, visit C:\Windows\System32\Drivers\Etc or C:\Windows\Syswow64\Drivers\Etc on server.
- Later, double-click on host file and also opt for the Notepad on getting prompted for program.
- Also, manually type IP address and also the system’s name. For server type you must type IP and the system name. For a system, type the server IP and system name. For separating IP address and system name, also hit on Tab key on the system rather than clicking on Space bar.
- You can open QuickBooks in the multi-user mode and notice whether the QuickBooks 2022 error H202 while opening company file is fixed yet.
Solution 16 – Make New Folder for Company File
- The method needs users to make new folder on server.
- After this, you must also make changes in new folder permissions and sharing of QuickBooks company files.
- You must also copy (Ctrl + C keys) .qbw files to new folder.
- At last, in multi-user mode open company file.
Solution 17 – Repair Network Errors With Connection Diagnostic Tools

- The initial step would be Downloading and installing QuickBooks connection diagnostic tool on the hosting system.
- Then, also scan the folder that stores QuickBooks company files.
- After that, you must also note down IP address showing when connection diagnostic tool runs.
- The next step would be configuring firewall ports as instructed from diagnostic tool.
- You must also follow further connection diagnostic tool instructions.
- Finally, you must try opening the QB company files on your system in which H202 error in QuickBooks shows up.
Solution 18 – Examining Services In The Host System
For the uninterrupted function from the H202 error code QuickBooks, it would be vital for QB services to operate without trouble on the server.
- Access the host computer and also press together R and Windows keys on the keyboard for opening the Running window.
- Visit search panela and also type the message “services.msc,” and then click the button OK.
- In the following services screen, locate and then choose QuickBooksDBXX option (XX is the QB year version).
- Also ensure that the option Startup type shows Automatic.
- You can also check Service Status. When it doesn’t display Running or Started mode, click the Start for doing it.
Later, you must tap on Recovery button and select the option “Restarting the Service” for below mentioned categories –
- First failure
- Subsequent failure
- Second failure
- Save changes after you click on the Apply button. Then click on the OK button.
After finishing, you should repeat the procedure and also select QBCFMonitorService in the third step.
- After this, access all the workstations and enable multi-user mode.
H202 error in QuickBooks can be solved by any of the above stated methods and the type of problem you’re facing would determine whether the applied efforts would be worthwhile or not.
Final Summary
All the working methods are listed above to ensure that QuickBooks error H202 multi user mode doesn’t interrupt your day to day activities on the software. Business enterprises who are still unsure about the proper methods to apply fixes can reach a professional QuickBooks team to get assistance as the technicians are skilled enough to guide you on the best possible ways of stabilising the situation. Further you can also get solutions for fixing connectivity problems like the QuickBooks error 15240 and other update and installation errors.
FAQs Related to QuickBooks Error H202
When the problem persists, following all of the aforementioned solutions, you should contact QuickBooks customer support teams to get help.
Remember that incorrectly performing the aforementioned solutions leads to loss of data. Therefore, it would be suggested to back up the system file. However, on suspecting that the company file has been severely corrupted and damaged, getting professional help ensures that you get the problem fixed within the least possible amount of time.
It is possible to get QuickBooks error H202 fix after following the below mentioned instructions.
Start with refreshing QuickBooks Database Server Manager on server.
Add system’s services to the Windows Admin group after you verify.
Later, you must configure firewall for pining server.
End after adding IP address of the server to Windows host file.
The QuickBooks H202 error switching to multi-user mode starts while attempting to link to a company file in QuickBooks Desktop but not being able to communicate with server. It also occurs as an outcome of firewall blockage and incorrect configuration settings.