
When we talk about some of the widely used software for business owners and firms to manage all their finances in a single place, QuickBooks is the first name that comes to everyone’s mind. But, as time passes, QB users encounter various types of errors and issues. QuickBooks error H101 is one of them.
The error usually appears when the user tries to access QuickBooks business folders or files, such as shared files and folders available on a different server. The error may appear on the screen if the user doesn’t set up the system for the additional configuration to access a specific file. Follow the various troubleshooting steps to fix the issue quickly without any hassle.
Understanding the QuickBooks Error H101
While working on the QBDT application, the users may require some additional/external files or folders to work on. In that case, they need some specially configured settings in the QuickBooks software to easily access the files without any hassle available on some other servers or systems. If the user cannot access the files or folders or is restricted from doing the same, QuickBooks error H101 may appear on the screen.
The error may occur due to security reasons, blocking of the firewall, improper settings, etc. Accessing the Company File in a multi-user mode can cause the issue. In addition to this, resolving this issue is not a heavy task anymore. Some troubleshooting steps are available that are not so technical, and you can easily apply them to your system if you are facing the same issue.
Probable Reasons for Getting QuickBooks Error Code H101
Users can only apply the correct troubleshooting steps on their system if they are sure that the error is the same and also aware of the reasons for getting the issue. This will help them fix the QuickBooks error H101 without any confusion, and with the right steps, they can rectify the problem. Here is a list of all the possible reasons why a user may face this issue on the QBDT application:
- Firewall settings block access.
- DNS settings are not correct.
- Not installed properly.
- Damaged or corrupted files.
- Issue with the Host Settings.
- Server Manager database fails issue.
- Unable to access the Company Files due to .ND files are not properly set up.
Quick Fix Solutions for QuickBooks Error Code H101
Some quick fixes for the QuickBooks error H101 to resolve the issue are available and can resolve the issue quickly. However, the users must follow all the available steps in any specific method to troubleshoot the issue. Here are all the possible methods to fix QuickBooks error code H101:
- Method 1: Verify the QuickBooks Services
- Method 2: Create a new shared folder for your Company File
- Method 3: Verify the Hosting
- Method 4: Rectifying the issue with the QuickBooks File Doctor Tool
Remember the Key Points Before Proceeding to the Troubleshooting
Before moving to troubleshooting to fix the issue, it’s recommended to take the backup of company files and other important data to avoid loss. Here is a list of some other key points to remember:
- Check the Internet Connection to ensure the network is stable and working properly.
- Set up the Firewall settings to remove any QuickBooks restrictions.
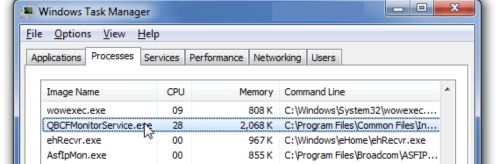
- Check whether the QuickBooks DBXX and QBCFMonitorService are working properly.
- If the issue is still unresolved, try uninstalling and reinstalling the QuickBooks on your system.
Method 1: Verify the QuickBooks Services
Verifying the QuickBooks services is one of the best and quickest solutions for the problem. Follow the below steps to do the same:
- Press Windows+R to run the command prompt.
- Type “Services.Msc” and press the “Enter” button.

- Then, search for the QuickBooks DBXX service in the service window.
- Now, check for the startup type and whether its status is running.
- The startup must be on “Running.”
- Press the Recovery tab there.
- Then, click on the drop-down menu.
- Select to Restart the service for the first failure.
- After completing this, if it fails to Reboot, repeat the process for a second failure.
- Then, click on the OK button to save the changes made.
- Now, repeat all the steps for the monitor service.
- Lastly, open the QuickBooks again on all the workstations if available.
- Also, try it in a multi-user mode.
Method 2: Create a new shared folder for your Company File
Another best way to fix the issue is to create a new shared folder for the Company file. To make it happen, follow the below steps:
- First, Go to the Company settings.
- Click on the Company File Location.
- Then, click on the Change Location option to browse the folder.
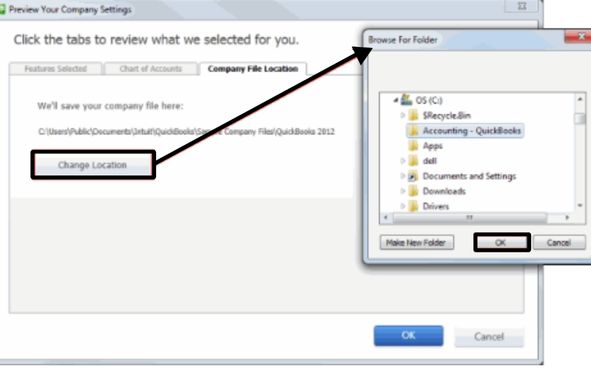
- Create a new folder on the system by clicking Make New Folder.
- Click on the OK button.
- Then, share the newly created folder on the hosting computer
- Now, set up Windows to get access to share company files.
- Copy the “.QBW File” and paste it to the newly created folder.
- Now, open the company files in the Multi-user Mode.
Method 3: Verify the Hosting
Many users reported resolving the issue by only verifying the hosting. To verify the hosting by yourself:
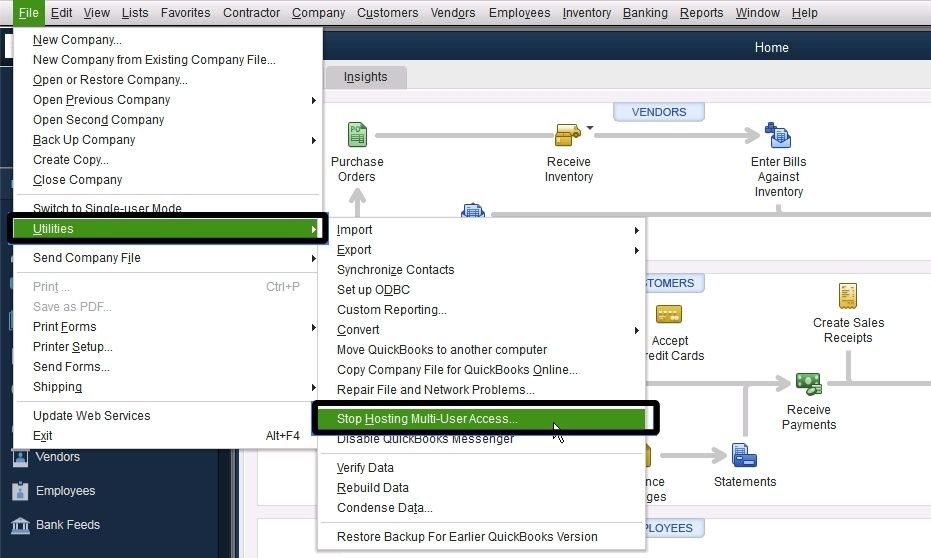
- Open the QuickBooks software.
- Go to File.
- Click on the Utilities option.
- Access to a Multi-user host on the system.
- Click the Stop Hosting button to set the Multi-user access.
- Follow the process for all the systems.
- If an option is available, “Host Multi-User Access,” check or move to the other station.
- You have to move the file to the server computer from where you can host a company file.
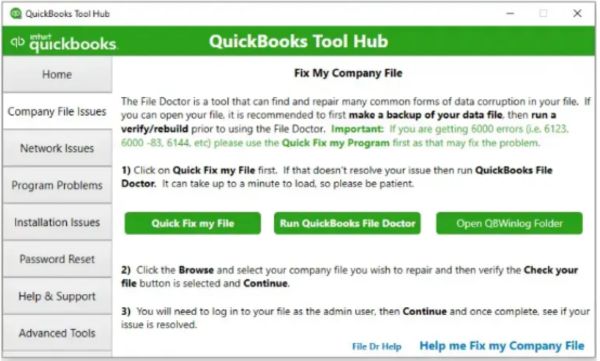
Method 4: Rectifying the issue with the QuickBooks File Doctor Tool
QuickBooks File Doctor is the ultimate issue-rectifying tool for QuickBooks desktop applications. The tool troubleshoots almost all the errors and issues in a system restricting QuickBooks from working properly. Once installed and run, the tool may automatically find and resolve the issues, including the QuickBooks Error H101. Users must follow the below-mentioned steps to get it done:
- Go to the Intuit’s official website.
- Click on the QuickBooks File Doctor Tool.
- Download and install the tool.
- After it gets installed, Run it and let it rectify the error in the system.
Method 5: Setup the Firewall Settings again
Most of the time, strict firewall settings restrict many programs to work properly. Setting it up correctly may resolve the issue permanently. Here are a few steps that will help you fix it quickly:
- Press the Windows+R to open the Run Command prompt.
- Then, type Control and click on the OK button.
- The Control Panel will open.
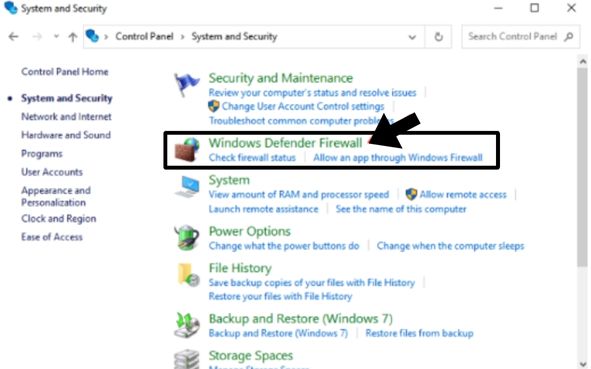
- Now, click on the System and Security.
- Select the Windows Defender Firewall.
- Click on Allow Through Windows Defender Firewall to remove restrictions.
- Now, click on the QuickBooks option.
- Select the OK button to complete the process.
Method 6: Fixing Through QuickBooks Database Server Manager
Downloading the QuickBooks Tool Hub is a step towards fixing the QuickBooks error H101. Rest can be resolved by running the Tool Hub application, as this is exceptional software that can resolve all the errors in the QBDT application without any miss. This can be done by accessing the QuickBooks Database Server Manager in the system. Follow the below steps to fix it quickly:
- Download and Install the QuickBooks Tool Hub.
- Open the software by clicking on the Desktop icon.
- Click on the Network Issues tab.
- Then, select the QuickBooks Database Server Manager to proceed.
- Click on the Start Scan option if the Company File location is correct.
- If the location is incorrect, click Browse to locate and select the Company File.
- Then, click on the Start Scan button.
- Now, the QuickBooks Database Server Manager will start repairing the firewall.
- After the process is done, it will give you the required permission and access.
- After the completion, click on the Close button.
- Then, open the QuickBooks Desktop application.
- Check whether the QuickBooks H101 error is appearing again on the same task.
- Then, locate the file after switching to the Multi-User Mode.
Concluding!
While using QuickBooks, many users may face various temporary errors, which can be resolved by following quick troubleshooting steps. QuickBooks error H101 is one of them that may occur at any time due to various reasons.
The error restricts the user from working in Multi-user mode, and one cannot open the files and folders available on a different server. These troubleshooting steps are effective and helpful to fix the issue without any external help.
Many errors can be resolved with these troubleshooting steps, such as QuickBooks error code 213, etc. If the issue is unresolved, you can visit the official Intuit website and ask the technical expert to help you directly via phone.
People Also Asked About QuickBooks Error H101!
Error Code H101 in QuickBooks states that the system cannot access a file or folder on another server. This usually appears on the screen if the QuickBooks server files are moved, corrupted, have firewall restrictions, etc.
Incorrect DNS settings, QuickBooks not being installed properly, damaged or corrupted files or folders, wrong host settings, etc., are some of the main reasons for facing the QuickBooks error H101 on the system.
Fixing the H101 error in QuickBooks is not heavy and can be fixed in a few troubleshooting steps. Users need to ensure the device is properly connected to the Internet. Also, one must verify the QuickBooks services, create a new shared folder, and run the QuickBooks Tools Hub software in the system.